Hi all,
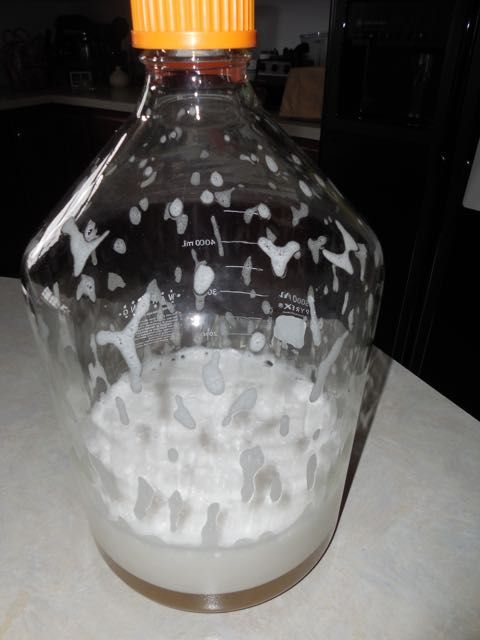
I’ve tried SNS starters several times with mixed results. The one thing that stands our to me is that I can never get my 1 gallon glass jug completely filled with foam, and give up shaking after about 15 minutes, or if I feel like I am going to pass out ;D . I’ve given it a PBW soak and sanitize. What could be knocking down the foam, or preventing it from filling the jug?
Thanks in advance.
Hard to say. FWIW, I often don’t get the entire container filled with foam and it still works fine. I feel like it’s a case of close enough is good enough.
i shake for way less than 15 minutes. honestkly just about 60 seconds. currently the yeast packets im adding claim 180 billion cells per pack and they suggest just adding it to the wort directly. You might consider what yeast brand (ie. white labs old style liquid packs claiming a range of 60 to 120 billion cells per pack) as a factor if you’re having issues with SNS.
though it sounds like you’re mainly concerned about the foam. SNS is very much RDWHAHB
Thanks guys, I try not to take ‘filled with foam’ too literally but I can’t seem to get more than 50%. Enough of a difference from ‘filled’ that it makes me wonder.
I shake the wort before adding the yeast, and shake about a minute or until ~75% of the liquid has turned to foam. That doesn’t fill the container much more than halfway. I let it sit a few minutes, then do it again, then I add the yeast. My experience has been that you get less foam after adding the yeast. It seems that something in the yeast pack interferes a bit with foam development and retention.
Cell counts can be a distraction. I’ve found that healthy, active yeast is much more important.
yes, i say cell counts but in practice i honestly just think of it as slurry in regards to harvesting and have almost never tried calculating cell counts. i then define it by
-age: old/stored, had sat for a week to 3 weeks, or sat under a week after harvesting (fresh)
-volume: storage sample in the fridge ~50-75ml, 250ml, or 500 ml etc etc.
My concern about the amount of foam is driven by the assumption that it is representative of the amount of oxygen dissolved in the wort. Assuming that the dissolved oxygen is the real goal in shaking, maybe my assumption about foam representing that quantity is flawed. In the end we just want to dissolve as much oxygen as the 3 quarts of air in the jug can provide, yes?
Opinions vary… here is mine, $0.00
My theory is the shaking distributes the yeast in the wort very well and that is pretty much the limit of its value. I do not think the foam is introducing any more oxygen to the wort than was already in it before you started shaking. I say this having not even tried an SNS starter yet, but I can see why people would prefer this method and I have no doubt that it works just as well as any other.
Pure Oxygen dissolves into a liquid at a pretty good clip. Pretty much about as fast as you can provide surface area, it’s absorbed to saturation. I’m not sure if the mechanics of it are entirely the same when we are talking about oxygen in the atmosphere, but given the fact that you can pour your perfectly good beer onto a plate and take a sip within 2 seconds and it’s already oxidized and horrible, I’d say it still happens pretty fast.
If you want to know how much oxygen is indeed being absorbed by the wort, put it in your container and seal it with a lid that has an access hole for a blow off tube. Obviously a tight fitting one with no leaks. Add the tube and run the other end into a bucket of starsan. Now shake to your heart’s content. The amount of oxygen dissolved into the liquid is precisely the amount of liquid pulled up the blow off tube into the wort. If you shake the first time and you are not scrambling to get that blow off tube out of the bucket before the starsan gets into your wort, then that should be telling you there isn’t much oxygen being introduced by the foam. My guess is it’s already in there from the time you allowed it to cool.
When I make wort for a starter I boil it and put it hot into canning jars. Sometimes I even pressure can it, sometimes I seal it and put it in the fridge. In either case, I don’t think there is much dissolved oxygen in the wort in those jars. I agree that saturation will be reached easily, and shaking to generate foam, with an enormous surface area, will help you reach saturation rapidly. That’s why I only shake for a minute or so. After adding the yeast the little guys will take up the oxygen rapidly, so shaking again some time later will saturate the wort again and provide them with even more. If you worry that shaking or agitating the yeast again will injure them, then you can skip that and assume that the initial oxygen charge was adequate.
Absolutely correct IMO.
If I remember Mark Van Ditta’s original articles on the SNS method I don’t believe he said the vessel had to be completely filled by foam. I seem to remember 50% which is what I’ve always aimed for. I can get that by shaking for far less that 15 minutes… more like 3 to 5 max.
Yes, look at the photos at: Shaken, not Stirred: The Stir Plate Myth Buster | Experimental Brewing
I use a bottle like this, which is lightweight, shatterproof, sanitizable and has a handle built in. Amazon.com
The handle would certainly help. I have a glass gallon jug that was sold with wine in it.
Yes, he did say to completely fill it with foam.
A well-shaken starter in a 5L media bottle: http://i699.photobucket.com/albums/vv356/tonestack/Brewing/WSY_NO_64_SNS_zps4331525f.jpg
Note it is not full of foam.
How I adapted SnS to dry yeast: Once I add strike water to grain and begin the mash, I add water and Go Ferm Protect to a mason jar and shake the crap out of it. I then add my calculated pitch rate of dry yeast and let it sit until mash out. I then shake the crap out of it again. I shake a cpl more time during boil and cool. I add Fermax to the jar and shake the crap out of it, transfer wort to fermenter and simultaneously pitch the yeast and add ALDC. I get rapid starts, vigorous fermentation in a few days, and full attenuation. YMMV
Full Instructions:
Vitality Starter
author S. cerevisiae
All one needs to make a well-shaken starter is a sanitizable vessel that is at least four times the volume of the starter being prepared, a sanitizable screw-on cap for the vessel, and a funnel. I do not know if anything comparable is available in the UK; however, one U.S.-gallon glass jugs (demijohns in UK speak) are plentiful in the United States. Home brew supply stores sell plastic replacement caps for these jugs that can be sanitized (38mm polyseal screw top caps). If one has money to burn, a 5L borosilicate glass media bottle like I currently use is a very nice toy. However, 5L media bottles can cost prohibitive when purchased new. I acquired my current 5L media bottle as unused laboratory surplus, and it was not cheap. I used a 1-gallon glass jug for a very long time before switching over to using a 5L media bottle.
Preparing the starter medium (a.k.a. starter wort)
The starter medium is prepared like one would prepare a starter any other way. A 10% weight/volume solution is made by mixing 100 grams of pale DME into a little more than 1L of water. The goal here is to end up with 1L of media after the solution has been boiled and cooled to room temperature. I boil the solution for 15 minutes in a 3-quart stainless steel sauce pan (A U.S. quart is slightly smaller than a liter). The media is chilled in the sauce pan with the cover affixed using an ice water bath in my kitchen sink.
Sanitizing the starter vessel, screw-on cap, and funnel
The starter vessel, screw-on cap, and funnel should be sanitized while the medium is boiling and chilling. While I use bleach and StarSan, feel free to use your preferred sanitizer. It is critical that the funnel is sanitized as well, and that one does not touch the inside surface of the funnel after it has been sanitized.
Note: One thing that I like to teach home brewers is to get into the habit of wiping the lip over which yeast or nutrient will be poured with an alcohol saturated cotton ball before decanting yeast, medium, or supernatant (supernatant is the clear liquid that lies above the solids in a starter, yeast crop, or a batch of beer). Wild microflora (yeast, mold, and bacteria) rides through the air on house dust. What we want to do is ensure that we do not drag any dust that may have come to rest on the pouring lip of the container that we are decanting into a vessel in which we intend to grow a culture or ferment a batch of beer. This precaution makes sense If one thinks about what a nurse or doctor does before giving one an injection. The reason why a doctor or a nurse cleans an injection site with an alcohol wipe before giving one an injection is to prevent the needle from dragging microflora that is on one’s skin into the injection site.
Pouring the starter medium
After placing the funnel in the starter vessel, one should wipe the pouring lip of the sauce pan in with an alcohol saturated cotton ball before pouring the starter medium into the starter vessel. I use 70% or 90% isopropyl alcohol. I used to use 95% ethanol (a.k.a. grain alcohol). However, my state outlawed its sale due to teenagers and young adults abusing it. Any 140 proof or better clear spirit will work. Please do not use methylated spirits.
Inoculating the starter medium
If using a White Labs vial, wipe the pouring lip of the vial with an alcohol saturated cotton ball before pouring the yeast culture into the starter vessel. If using a Wyeast smack pack, wipe the outside of the smack and the blades of the pair of scissors that one is using to cut a corner off of the smack pack with an alcohol saturated cotton ball before making the cut, and wipe the cut edge of the smack pack with an alcohol saturated cotton ball before pouring the contents of the smack pack into the starter vessel.
Caping and shaking
Here’s where my method differs from the way the average home brewer makes a starter. The reason why a vessel with a screw-on cap is necessary with this method is because one is going to shake the culture very vigorously for about a minute. I usually tell brewers to shake the starter vessel like it owes you money (think mafia enforcer). The goal here is to attempt to turn the media into foam. That’s why the vessel has to be at least four times the volume of the starter. One should then allow the starter to sit for around thirty minutes before loosening the cap to allow the foam to drop.
A well-shaken starter in a 5L media bottle: http://i699.photobucket.com/albums/vv356/tonestack/Brewing/WSY_NO_64_SNS_zps4331525f.jpg
Pitching the starter
Pitching is one area where most home brewers get it completely wrong. A starter is not a small batch of beer. It is a yeast biomass growth medium. The goal here is to grow the culture to maximum cell density and then pitch it. Maximum cell density occurs at high krausen. Beyond that point, all cell reproduction is for replacement only. Yeast taken at high krausen is much healthier than yeast that is taken from a sedimented starter or batch of beer. That’s why traditional breweries crop yeast at high krausen. Allowing a starter to ferment out and settle places the cells in the yeast equivalent of hibernation where they will have to undo survival-related morphological changes that occurred at the end of fermentation as well as completely replenish their ergosterol and unsaturated fatty acid reserves after being pitched.
High krausen should occur within 12 to 18 hours after pitching the starter. The yeast biomass grows exponentially, not linearly. The yeast cell count grows at a rate of 2^n, where the symbol “^” means raised to the power of, and n equals the number of minutes that have elapsed since the end of the lag phase divided by 90; hence, the difference in propagation time between 200B cells and 400B cells can be as little as 90 minutes.
British Versus American Pitching Rates
If one believes the yeast calculators found on American sites, one will end up growing 2 to 3 liter starters for 23L batches. Frankly, the guys who wrote this code know more about coding than they do about yeast. No two yeast cultures behave the same when pitched, and no two yeast cultures require the same pitching rate. The only thing that will teach one the proper pitch rate for any given strain is experience with the strain in one’s brew house. Additionally, it is often desirable to underpitch in order to achieve a desired flavor profile. British styles benefit from underpitching. I often pitch as little as 60B cells into 19L of wort when fermenting normal gravity beer (i.e., < 1.065). Wyeast 1768, which is allegedly Young’s stain, performs much better when pitched at a rate of 3B cells per liter than at a rate of 10B cells per liter when fermenting normal gravity ale. It produces what I like to refer to as the British lollipop ester when the beer is young. This strain produces a .delightfully fruity and malty pint when used with a grist that is composed mostly of British pale malt.
One day, you’ll wake up and there won’t be anymore time to do the things you’ve always wanted to do. Don’t wait. Do it now.
He says “The goal is to attempt to transform as much of the starter wort into foam as is humanly possible.” In other words, turn the liquid into 100% foam, but that would not necessarily fill 100% of the container with foam.
It might be wise to note that in the same article it begins by saying the idea behind the whole shaking thing is a poor man’s way of using an oxygen stone to inject oxygen directly. This is just me talking but, I’m just going to take the damn oxygen stone and put oxygen in the wort. Life is too short for all this scientific shaking. Lol. ![]()
All joking aside however, if there is no vacuum formed when doing the shaking, then there is absolutely not one iota of oxygen being dissolved into that wort. There is no free lunch, that gas has volume and the volume has to go somewhere. So if it dissolves, either we are forming a vacuum or something has to come in to replace it. If neither of those two things happened, then nothing dissolved.
Sorry, but that’s not the reality. Homebrewers have been shaking starters for decades to aerate them. That’s why some use stir plates.
The maximum concentration of oxygen you can get in wort from shaking or bubbling air is about 10 ppm. For 1 liter of wort that means about 10 micrograms of oxygen. A 4 liter jar with 3 liters of air at 20% oxygen concentration would have a bit less than 1 gram of oxygen. The fraction that dissolves is 10^-5, or 0.001%, which would cause a negligible pressure drop in the container.